
Showing posts with label diy project. Show all posts
Showing posts with label diy project. Show all posts
Thursday, July 10, 2014
quilted.
Wednesday, July 9, 2014
quilting, part 3.
so last i left off, the batting had been sewn to the front panel:


unfortunately while i was pinning that, an uncapped pen decided to make its mark. an immediate dose of stain remover and a cold-wash cycle helped hide the worst of it, though!

my first thought was to do a zig-zag machine stitch along the seams to "quilt", but that quickly showed itself to be a no-go. the quilt was large enough to be unwieldy on the machine, and since i don't have a quilting foot, the traditional foot pushed the fabric so that it gathered unevenly at the end of each zig-zag segment. so i thought i would try hand-quilting along the seams. i spent a bit of time and managed to make my way through four and a half rows of basic stitching:


while i liked the look, eventually, i realized that this option wasn't going to work either - it was really slow going. while that normally wouldn't be an issue, i have a lot going on, and most of all i wanted this quilt completely done before i move. so i ripped it all out, grabbed some embroidery thread, picked two of the four fabrics and put a tie in the center of each square of those two fabrics.

in short order, i had my quilt! it's not perfect but it's cozy, home-made, and best of all, DONE.
next step was to pin the backing to the front/batting combination, with right sides together. once pinned, i sewed along the edges to create about a half-inch border. (because this was my first go-round at quilting, i decided to skip traditional binding...maybe next time!) i left a section unsewn to be able to flip the quilt so that the right sides were out - next time i would make sure not to leave that section right at a corner! - and then pinned that section and sewed it up.
unfortunately while i was pinning that, an uncapped pen decided to make its mark. an immediate dose of stain remover and a cold-wash cycle helped hide the worst of it, though!
my first thought was to do a zig-zag machine stitch along the seams to "quilt", but that quickly showed itself to be a no-go. the quilt was large enough to be unwieldy on the machine, and since i don't have a quilting foot, the traditional foot pushed the fabric so that it gathered unevenly at the end of each zig-zag segment. so i thought i would try hand-quilting along the seams. i spent a bit of time and managed to make my way through four and a half rows of basic stitching:
while i liked the look, eventually, i realized that this option wasn't going to work either - it was really slow going. while that normally wouldn't be an issue, i have a lot going on, and most of all i wanted this quilt completely done before i move. so i ripped it all out, grabbed some embroidery thread, picked two of the four fabrics and put a tie in the center of each square of those two fabrics.
in short order, i had my quilt! it's not perfect but it's cozy, home-made, and best of all, DONE.
Monday, June 9, 2014
quilting, part 2.
once all the rows were sewn, it was time to pin right sides together and sew the rows into one giant panel.

sewing rows to rows.

front panel, complete!

pinned the batting to the front panel.

then sewed it on.


Saturday, June 7, 2014
quilting, part 1.
so when life decided it was time to shake things up and handed me a fair bit more spare time than i had been working with, i decided it was time to try making a quilt. after a trip to the fabric stores, i had this to work with...

next was a night of tv and the cutting of many squares.


and then pinned them into the rows i had laid out for sewing.

sewing commenced, one row at a time.

next was a night of tv and the cutting of many squares.
then, because i had an uneven amount of all the squares, i decided to simply lay them out in a visually agreeable way.
and then pinned them into the rows i had laid out for sewing.
sewing commenced, one row at a time.
Wednesday, March 19, 2014
diy: knit infinity scarf.

nothing super special about how i made this scarf...a regular knit stitch, with a lot of oops moments in the form of accidental extra stitches (while gorgeous and soft, the yarn had a tendency to split) and compensatory condensing stitches. the problem with those oops moments was the wonky shape that resulted...so to fix it, i turned it into an infinity scarf, with some very unprofessional weaving together of the ends. i'm just really glad it's done (i'm trying this new thing where i finish the projects sitting around my place before i start another, and this one has been hanging over my head ever since i found last summer while it going through my craft supplies). i'm all set for california's next cold snap...ha!
Friday, November 29, 2013
DIY: napkin folding
thanksgiving tablescapes are always helped along by fancy napkin folds, but who wants to spend hours folding napkins? these two folds look fantastic but are also super fast to pull together ...


step 1: lay napkin out as a diamond
step 2: fold bottom point and top point in to the middle
step 3: fold bottom up again, to middle
step 4: fold top down again, to middle

step 5: fold left side in, bringing the point just past the middle line
step 6: fold right side in, making sure the point overlaps the left side
step 7: flip the napkin over and pinch together at the center
step 8: tie the center with a ribbon and tuck the ends under the back

fleur-de-lis napkins:

step 1: fold in half, with the fold to the bottom
step 2: bring top left corner down to the bottom center, and top right corner down to the bottom center
step 3: bring bottom right corner up to the top center point; repeat with the left side
step 4: bring the top points down and out (as seen in photo 4)
step 5: slip into a napkin ring or tie a ribbon around the base


bow-tie napkins:

step 2: fold bottom point and top point in to the middle
step 3: fold bottom up again, to middle
step 4: fold top down again, to middle

step 5: fold left side in, bringing the point just past the middle line
step 6: fold right side in, making sure the point overlaps the left side
step 7: flip the napkin over and pinch together at the center
step 8: tie the center with a ribbon and tuck the ends under the back

fleur-de-lis napkins:

step 1: fold in half, with the fold to the bottom
step 2: bring top left corner down to the bottom center, and top right corner down to the bottom center
step 3: bring bottom right corner up to the top center point; repeat with the left side
step 4: bring the top points down and out (as seen in photo 4)
step 5: slip into a napkin ring or tie a ribbon around the base

Tuesday, November 26, 2013
diy: knitted washcloths

depending on the size, these can function as either a washcloth or a dishcloth...or if you made them fairly small, a coaster! if you know the basics of knitting, this is a super easy pattern and can be made pretty quickly. binge-watching of the office optional.
pattern:
cast on four stitches
row 1: knit one row
row 2: knit two, yarn over, then knit to the end of the row
repeat row 2 until there are 44 stitches on the needle
next row: knit one, knit two together, yarn over, knit two together, then knit to the end of the row
repeat to continue decreasing until there are 4 stitches left on the needle
cast off
a great how-to video is available at the bottom of this post, which is the original source of this pattern. the video explains how to do a yarn over if that's a new term for you - it was for me! and while you definitely want to make sure your stitches aren't too loose, take care not to make them so tight that the "knit two together" step becomes impossible. enjoy!
Thursday, October 31, 2013
31 days of cards
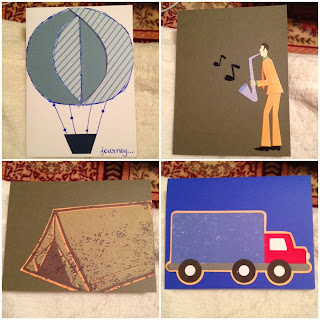
i decided to jump on the 31 day train. i even linked up with the personal endeavors category. i liked the intentionality behind the idea. for me, it wasn't every day of october, because i didn't think this was about creating a burden for yourself. it was about creating a benefit, for yourself or for others. so this month i snail-mailed as many home-made cards as i could manage to make! i know the joy i feel when i get mail, so it only seemed right to spread that joy.


.JPG)


Sunday, August 18, 2013
red pencil skirt
i felt the urge to be crafty this weekend. felt it in that overwhelming, can't ignore it kind of way. do you know what i'm talking about? no? oh well. regardless, for the sake of my sanity, something had to be created! but. biiiig but. i'm also trying to be frugal about my personal spending, so i didn't want to just run out to the nearest store and buy craft supplies. that meant painting, refashioning, and furniture remodeling {ha!} were out. i even tried making some progress on an ongoing cross-stitch first, but that wasn't really doing it for me.
enter a red knit fabric. once purchased to be the skirt of a homemade maxi dress, it has been sitting under my bed for a year now. but it could still be a skirt, right? right. and since my guy has recently expressed a like for pencil skirts... i decided to go for a casual pencil skirt. very casual, thanks to my lack of skills re clean seams on knits. alas. {i meant to post a semi-tutorial, but i forgot to take enough pictures along the way... sorry. i was distracted by the doctor&rose!}. anyway, try this one from merrick's art if you're interested in making your own!


enter a red knit fabric. once purchased to be the skirt of a homemade maxi dress, it has been sitting under my bed for a year now. but it could still be a skirt, right? right. and since my guy has recently expressed a like for pencil skirts... i decided to go for a casual pencil skirt. very casual, thanks to my lack of skills re clean seams on knits. alas. {i meant to post a semi-tutorial, but i forgot to take enough pictures along the way... sorry. i was distracted by the doctor&rose!}. anyway, try this one from merrick's art if you're interested in making your own!
front :: back

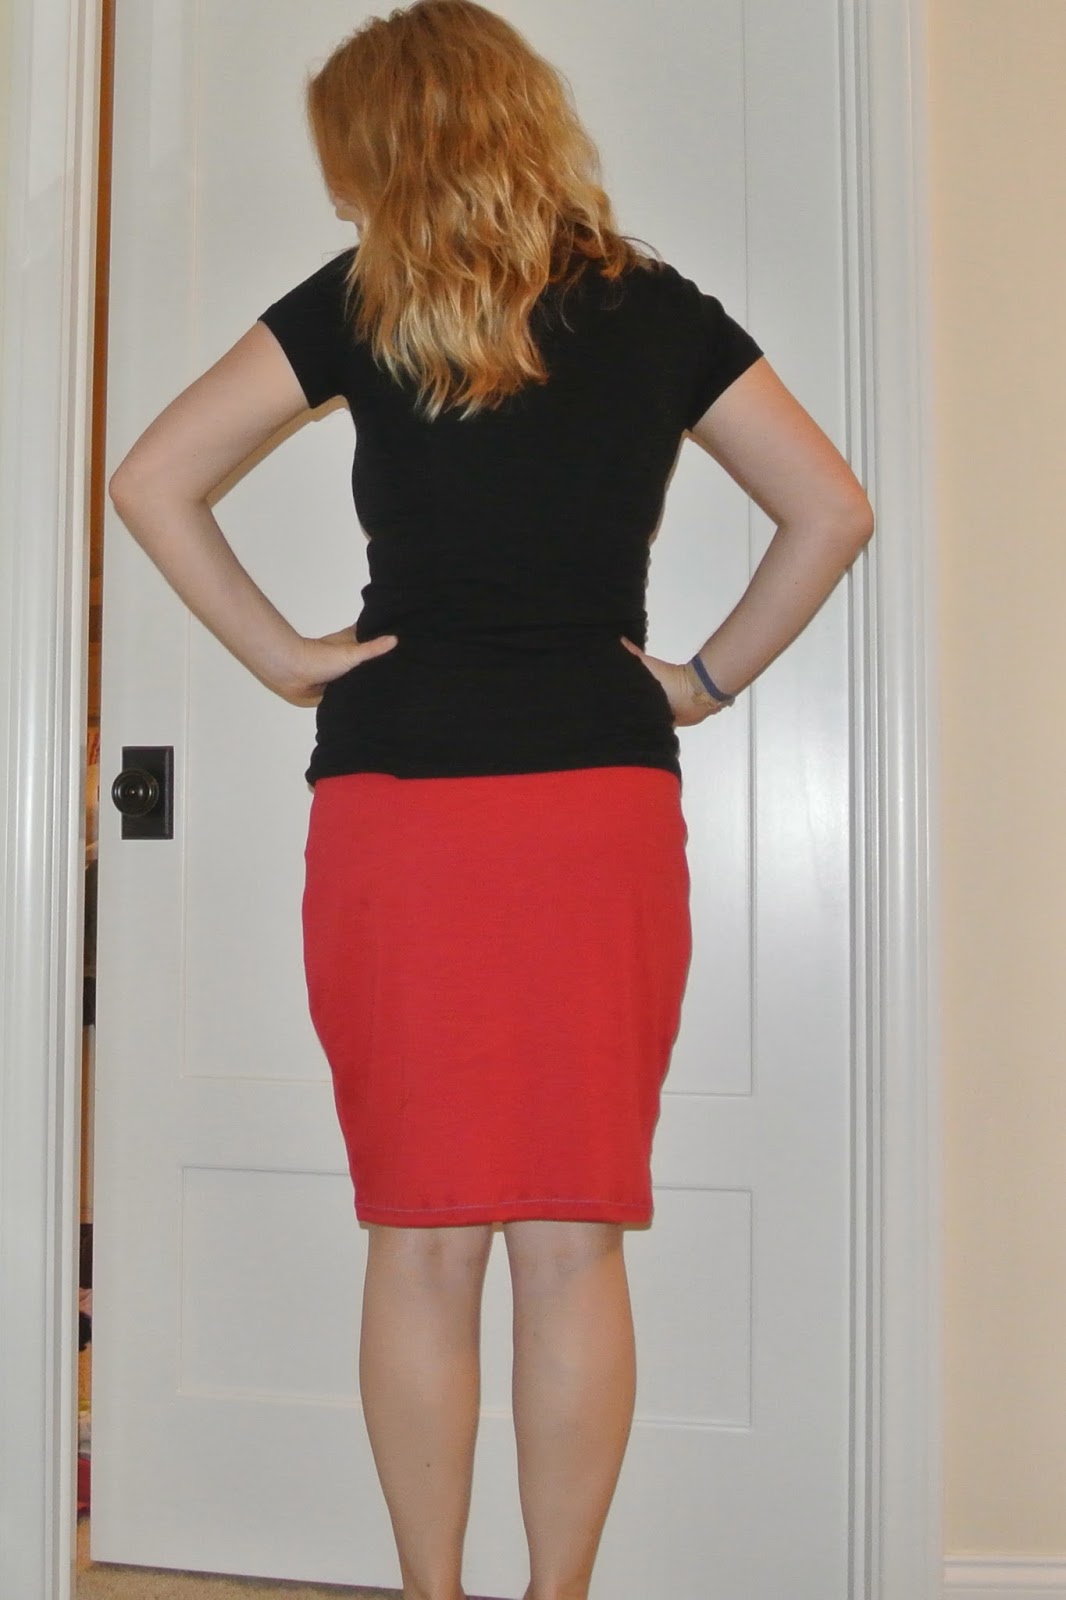
front again, with a look at the waistband {elastic, thankyouverymuch}

zigzag hem-stitch in blue. because contrast detail is cool.
{orrrr i didn't have red thread.}

Wednesday, January 16, 2013
365:351
who actually created something she pinned? this girl! wahoo for that. i have lots of scrapbook material left over from when i fancied myself a scrapbooker (before i discovered photobooks!), and what's better to get in the mail than a hand-made card?? plus it puts those papers to use, so they aren't just sitting around taking up space.


Monday, January 14, 2013
365:349
made this last night from scraps to replace the plastic one the machine came with. definitely a learning experience on piecing things together, and working without a pattern. enjoyed practicing the zig zag stitch though!

Thursday, January 10, 2013

Wednesday, January 2, 2013
365:336
my guy and i were killing time at the airport with cribbage and cross stitching...we're quite the pair, with our old-timey habits.

Tuesday, December 18, 2012

Tuesday, November 27, 2012
365:300
the beginnings of my christmas decor. i love this season...the joy and hope that fills the air is incredible. the wonderful treats of spending time with family...seeing the excitement on people's faces when you give them a gift that speaks of thoughtfulness and love...strangers giving to strangers without resentment, without reserve...ah. glad it's here!

Thursday, November 8, 2012

Tuesday, October 30, 2012
365:272
this image was the very first cross-stitch i ever made, back in the fall/winter of my first year of law school. a few weeks back i found this fabric in a scrap bin, just enough of it for a small pillow. sewed up the pillow this weekend, stitched the image on tonight, and am a little bit proud to have my very first home-made pillow sitting on my couch.

Monday, October 29, 2012
365:271
upcycled some old jeans into an early christmas craft of stockings for my fake mantle place. broke my first sewing machine needle in the process when i failed to pay proper attention and attempted to sew over a metal rivet. not my brightest moment, but i persevered and wound up with a half-decent result

Friday, October 12, 2012
365:254
made two wreaths using straw wreath forms, burlap and a sizeable helping of hot glue. added a little whimsy in the form of fabric rosettes and lace doilies. the neutral tone of the burlap helps with my goal of reducing the amount of stuff i own - it works year round, so all that's needed to make it seasonally appropriate is one of the myriad of fabric rosettes i made during the veep debate. lucky for me, rosettes store far more compactly than wreaths.

Tuesday, October 9, 2012
365:251
supplies: burlap-covered straw-wreath, hot glue & glue gun, pins, needles & thread. just a step or two more, and a bit more skin lost to the dangers of hot glue, and this wreath adventure will be complete

Subscribe to:
Posts (Atom)